Lex Fridman: “So some people listening to you right now will say DHH is suffering from the old case of AI psychosis. Can you steelman the case that you are, in fact, in a state of delusion, like One Flew Over the Cuckoo’s Nest, and can you argue against it?”
DHH: “I’m in a state of delirium. That’s the state I’m in.” 1
I’ve been following Omarchy ever since David Heinemeier Hansson (aka DHH) announced it on his blog. At the time, I picked up a few UI/UX ideas from Omarchy 3 and recreated some of them on macOS. Over the past year, while macOS 26 Tahoe ushered in what I consider the darkest period for macOS, I’ve actually enjoyed using my Mac more thanks to those modifications and my decision to stay on macOS 15 Sequoia.
A few weeks ago, DHH released Omarchy Quattro and kicked off his grand tour. More recently, he returned to Lex Fridman’s podcast. I didn’t watch the whole video, but there were a few things I thought were worth sharing and thinking about.
First, at around 2:23:49, DHH talks about how Omarchy integrates an AI agent directly into the operating system so that it can help when something goes wrong. For instance, when an app crashes, a crash watcher pops up and asks whether you’d like to let the agent take a look. I think it’s a brilliant design because we already have coding agents that can deal with bug reports in software development, so why not adopt the same idea system-wide?
And if you watch the video, there’s a slide at around 2:24:17 explaining that some people think Linux error messages are too verbose for ordinary users, but that verbosity is perfect for an agent. Few things are more useful to an agent investigating a problem than detailed diagnostic information, especially when the agent lives right inside the system and much of the software running on it is open source.
I instantly got it, because that’s already how I use agents on my Mac. When something goes wrong and I have no idea how to fix it, I ask an agent to inspect the problem, explain it to me, and then try to fix it.
Omarchy’s agent integration also reminded me that while macOS often surfaces only minimal error information to users, much more detailed diagnostic information is available in system logs. So from an agent’s perspective, much of the groundwork is already there. Apple just needs to make these capabilities easier for agents to access through better documentation, skills, MCP servers, and CLIs. Most importantly, it needs to make sure they’re well maintained.
Second, the quest for speed.
DHH has been proud of how quickly Omarchy can be installed. At the time of recording, the record was around 45 seconds. (I saw one YouTuber install it on an old gaming laptop in about four minutes.) And it’s getting faster! 2
When Fridman asks why he’s so obsessed with getting the installation time below one minute, DHH brings up something Mitchell Hashimoto wrote:
The pursuit of excellence does not need justification.3
DHH also gave Fridman a custom Dell XPS laptop and asked him to run a disk speed test.
“What are you getting?” DHH asked.
“7 GB/sec,” Fridman said.
DHH launches into the math:
“So seven gigabytes a second. That’s how fast that drive is. Why can we not install a Linux distribution in one second? The Omarchy distribution is 5.8 gigabytes. If we can run at seven gig… Now, of course, you can’t actually do that because the USB key is a lot slower than that, but you should be able to maximize the underlying physics and protocols that we’re dealing with, and that’s your goal. We gotta get all the way back down to that.”
You can tell how obsessed DHH is with installation speed. Getting it down meant optimizing almost every part of the installation process.
One trick was to treat the time spent waiting for human input as an opportunity to preload things in the background. Omarchy asks users a handful of questions during setup, such as their username, password, and time zone. Instead of waiting for the user to finish, the installer can use those few seconds to get a head start. DHH points out that video games have been doing this kind of preloading for years.
Another was aggressively shrinking the ISO. The previous version was about 7.5 GB, while Quattro was down to roughly 5.85 GB. DHH explains that decompressing package files now accounts for much of the installation time, so reducing the size of the ISO translates almost directly into shorter installation times.
DHH later talks about how long it took him to install macOS and Windows on new machines. I don’t think it’s an entirely fair comparison, but that’s not really the point. When you can install an operating system and set up your environment that quickly, hacking on and even breaking the system becomes much less scary or inconvenient. “So what? I can put things back in a few minutes.”
Once a user, even a grown-up one, develops that kind of mindset, playing around with a computer starts to feel fun and liberating again. Not to mention that now there’s an AI agent at your disposal to help you deal with the consequences of being reckless.
Watching DHH obsess over installation speed also reminded me of something that has frustrated me about macOS software for years. (I’m using macOS as an example simply because it’s the ecosystem I know best.) Many app developers, especially those from large companies, seem to no longer care about user experience, performance, efficiency, or how much disk space their apps take up. I’m not sure whether AI has made this worse, but the trend started long before people began using AI to build software.
I understand that some of these bad development choices are driven by a combination of cost and cross-platform strategy. In other words, it’s about business. I understand that. And it’s almost certainly not because they care about users on different platforms or about how those users feel while using their apps. In the end, it’s also because we, as users, tolerate this kind of laziness and carelessness.
In an age of cross-platform but often mediocre apps, I admire what Mitchell Hashimoto has done with Ghostty. It’s also why I’m eagerly looking forward to what he and his team at Superlogical are building.
Back to the video. When I watched DHH talking about Omarchy and computers, I felt encouraged. His passion was infectious. Perhaps it’s because I watched the video at midnight, or because he is right: things should work that way.
There’s another clip I find entertaining. At around 2:40:58, DHH talks about how he ran out of tokens on his Claude Max account and had to sign up for another one. Fridman says he has four accounts. DHH then complains about having to log in to multiple accounts instead of simply stacking subscriptions.
With a sheepish grin, Fridman says, “And obviously you’ll have to develop some kind of tooling—”
“Yes, I did that too,” DHH jumps in.
Before Fridman can even finish saying “to move from one to the other,” DHH adds that they’re building multi-subscription support directly into Omarchy.
At that moment, you realize you’re just watching two people who love talking about computers and comparing notes on how they use them.
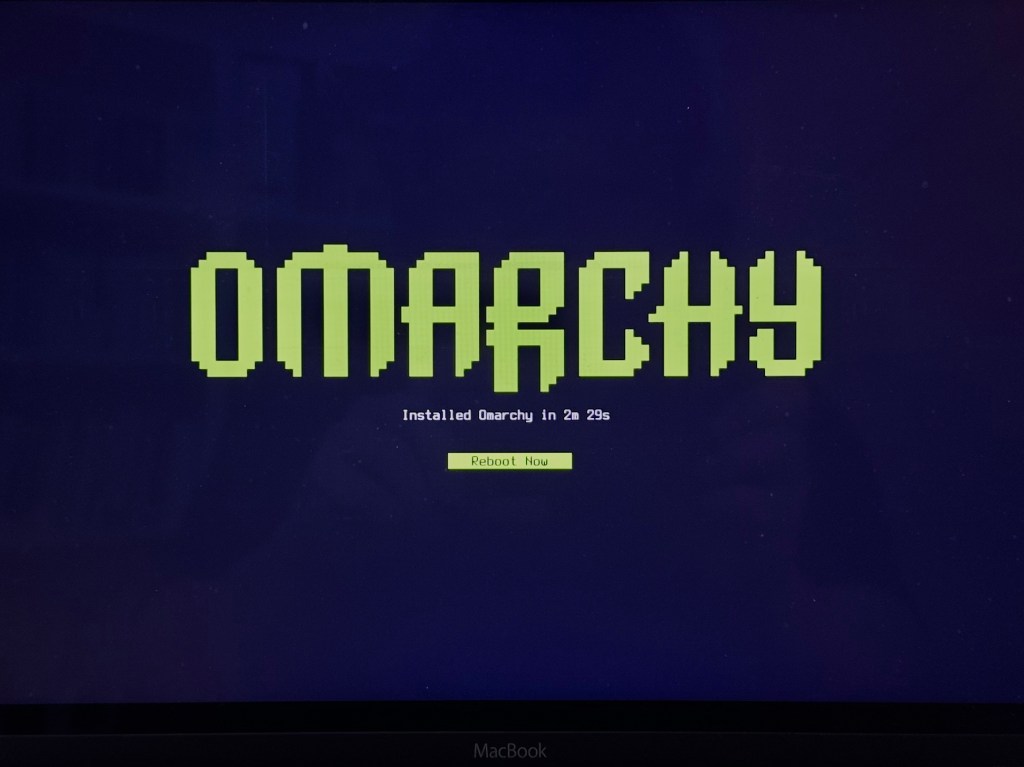
The day after I watched the video, I dusted off my old 12-inch MacBook (MacBook8,1), which I bought in 2015, and installed Omarchy on it with some help from a few posts and, you know, my coding agents.4 It took me some time because I did some research to make sure I could do it right, but the installation itself was quick: 2 minutes and 29 seconds. Soon enough, I got the chance to let the agent inspect an error and fix it. It worked exactly as DHH described. I wouldn’t say I’m in a state of delirium like him, but I was having a great time.
That said, I’m not quite as sold on Omarchy as many people in the community seem to be, either as a daily driver or as something that could bring Linux to a mainstream audience. Still, I think it’s a great step in that direction. Let’s save that topic for another post.
But as I mentioned earlier, I do want to say that I was genuinely inspired by how DHH and ThePrimeagen use their computers. About a year ago, I created a workflow similar to what I learned from the previous version of Omarchy and the way ThePrimeagen switches between apps and desktop spaces. Now I’m sure it works for me. I should have written about it months ago. Hopefully, I’ll get that post out soon.
Lex Fridman’s interview with DHH, around 37:21. Lightly edited for clarity and readability. ↩︎
In late April, I discovered exe.dev through “I am building a cloud,” a widely shared blog post by its co-founder, David Crawshaw.1 Since then, I have been playing around with VMs on exe.dev. In this post, I share my experience and some thoughts about it. (If seeing David Crawshaw’s name was already enough to convince you, there’s an invite link at the end of this post.)
Users can create multiple VMs on exe.dev and let AI agents run in them without worrying that agents might break their local machines. There are many cloud VM options on the market, but exe.dev takes a very different approach to how VMs are positioned and used, and the result is surprisingly easy to use. I’m not a programmer. However, even I can use it after reading a few lines of their documentation—yes, no AI help needed here.
In the past few weeks, I mostly experimented with moving projects to different VMs, letting agents work on them, and building out my dotfile setup. At first, I didn’t really use exe.dev’s built-in coding agent, Shelley. It’s an agent that can use models such as Claude Opus and other leading LLMs. Users can also bring their own LLM provider API key or ChatGPT subscription, and use Shelley through the web interface.
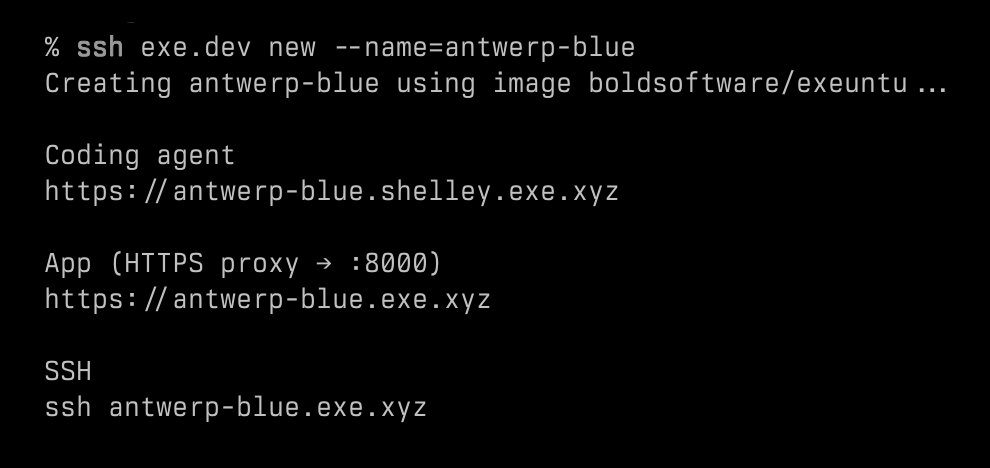
A few days ago, I decided to use Shelley to build something useful. First, I cloned a template VM that I had created for the dotfile management practice with a single command: ssh exe.dev cp [my-source-vm-name] [new-vm-name], and in a few seconds, I got a new VM for development. Next, I asked Shelley to use Astro to build me a personal website and host it on another exe.dev VM. My spec was simple: using the style of this website (the one you are reading) and referencing another website for the structure. Shelley then asked me a couple of questions for clarification, such as whether I wanted one or two columns and where the navigation should go. The only thing I had to do manually was create another VM for the production site.
Once everything was set up, Shelley began to work. And that’s it. In just a few minutes, I got a website with all my content copied from this blog, and I could view it through a private link without additional configuration. I can later make it public under my own domain. By that point, it had cost about $4 in credits. (My plan includes $20 in credits per month, plus a one-time $100 credit that doesn’t expire. I can purchase additional credits if needed. You can check the pricing page for the latest plan details.)
Update (2026-09-29): They’ve updated their pricing.
Although there are still parts of the website I’d like to refine, I’m impressed by how quickly the whole thing came together. Shelley can capture screenshots of the page as it works and use them as feedback during development, or simply show them to you after a change—just like the feedback loop I wrote about in this post. My original plan was to put together a thorough plan with Codex or Amp and then let one of them do the job. I also expected to spend a lot of time reviewing the output. Not to mention all the infrastructure-related decisions, such as hosting, networking, and security, especially since I wasn’t planning to make the site public yet.
I know this is not a perfect comparison, because I was used to working with agents under conservative permission settings, while Shelley is designed to require fewer permission prompts.2 And because I mainly wanted to try Shelley, I gave it a fairly simple spec.
Building the website was impressive, but what ultimately got me interested in exe.dev wasn’t the website itself. It was the idea that my agents could have their own computers.
Your Agent Needs a Computer
Before exe.dev existed, David Crawshaw and Josh Bleecher Snyder were already building what we would now call a coding agent. One thing they learned from that work was that agents needed their own isolated environment instead of running directly on a developer’s machine.
At first, they thought containers were the answer. But as they brought the product to more companies, each one seemed to expose a new reason why containers weren’t quite enough.3 Eventually, they concluded that agents needed their own computers. And that became one of the reasons they built exe.dev. It went online in late December 2025.
Don’t get me wrong. exe.dev is not just a disposable sandbox. The VM can host a database, run services, keep files around, and serve as a long-lived workspace for either a developer or an agent.
What makes it different is how lightweight it feels. When I need a VM for a quick experiment, I can get one instantly and it is ready to go. Creating a VM on exe.dev feels more like creating a new folder on my computer than provisioning a new server. Crawshaw wrote this in his post that I mentioned earlier:
A Linux VM is a process running in another Linux’s cgroup, I should be able to run as many as I like on the computer I have.
I think that captures the philosophy behind exe.dev.
As I learned more about exe.dev and its co-founders, I found that David Crawshaw and Josh Bleecher Snyder both worked at Tailscale; Crawshaw was even one of the co-founders and the CTO of Tailscale. If you have read this blog for a while, you probably know I really like Tailscale. In this post, I described how I use Tailscale:
When I take a break between bouldering sessions, believe it or not, I sometimes use the Termius app on my iPhone to SSH into my Mac at home, check Claude Code’s work, or assign it new tasks via tmux running in Ghostty on my Mac.
I want to access my computer and manage my agent anytime I want when I’m on mobile. In this case, I can access my exe.dev VMs in the same way I mentioned above, or just using exe.dev’s mobile web. But now we have a new option with a better experience: an iOS app.
Voice Mode in the iOS App
I’ve been in their TestFlight since mid May, and it’s now in the App Store. The app’s quality is pretty good. There is a special feature I want to talk about: the voice mode.
The voice mode is a voice interface between the user and Shelley, powered by OpenAI’s Realtime API. When I tried this feature for the first time, I thought: why bother? I can just use dictation in the text chat interface with Shelley. But later I realized that the voice mode is different. I can simply tap the microphone icon and start talking, then the voice assistant relays my words to Shelley. When Shelley is done, I get a notification with the result. Most importantly, it can run in the background. In this way, the interaction feels more natural. I don’t have to pick a VM or open a new conversation with Shelley first. Just one tap and start talking.
The only thing I’d like to see improved is what happens after Shelley finishes a task. Right now, I need to come back and ask the voice assistant for an update. It works, but it feels slightly less natural than the rest of the experience.
Interestingly, if I ask something like, “Is there anything that needs my attention?”, the voice assistant can already answer me. From what I understand, it isn’t even talking to Shelley at that point. It’s simply reading from the system’s attention list. That’s why I can’t help but wonder how much more seamless the experience would feel if the voice assistant could proactively surface those updates instead of waiting for me to ask.
My agents now have their own computers, and I can access and manage them from anywhere, by text or by voice. I think it’s great!
If you’d like to try exe.dev, you can use my invite link because it will give you a 30-day trial (normally it’s a 7-day trial), and if you upgrade to a paid plan later, we will both get an extra $50 in credits for using Shelley! (The referral reward may change in the future.)4
According to David Crawshaw, Shelley is intentionally designed to “work dangerously.” Because it runs inside its own VM, it does not repeatedly ask for permission before taking actions, which Crawshaw considers a distraction that slows both the user and the agent down. To make that model safer, Crawshaw said exe.dev is working on a VM snapshot feature that regularly captures the state of the disk. If an agent accidentally deletes something important, such as a production database, users will be able to rewind the VM to an earlier snapshot and recover it. Source: High Leverage – Ep. #11, Why Agents Need Computers with David Crawshaw – YouTube↩︎
Recently, I’ve been using Codex CLI and Amp Code to improve my AI-powered VC news clipping workflow. One day, I hit Codex’s 5-hour token limit and had to wait another 2 or 3 hours before I could use it again. Just as I was getting pretty annoyed about that, it suddenly hit me: I’d seen Quinn Slack, the co-founder of Amp Code, say this on X: “You can tell it the Codex session ID and it can figure it out. I’ve done it!”
You can tell it the Codex session ID and it can figure it out. I've done it!
So I did it, and it worked—though I had to do a bit of convincing first.
I gave Amp the Codex session ID and asked whether it could continue the task. At first, it replied:
No — I don’t have access to Codex sessions or any way to read another tool’s session state from an ID. Each Amp thread only has the context shared in it here.
If you want me to continue work from a Codex session, paste the relevant content (plan, decisions, code snippets, file paths) into this thread and I’ll pick it up from there.
But I didn’t give up. I told Amp to try anyway. “I saw the founder of Amp say he’d done it before,” I said, along with the URL to Quinn Slack’s X post. Amp then used one of its skills to fetch the post and read it. After that, it changed its mind:
I found your Codex session (1,403 entries, 8.9 MB). Before I dig through 8.9 MB of history, what would you like me to do — summarize what was done, pick up the in-progress task, or extract something specific (plan, files changed, last user request)?
What Amp figured out was that Codex CLI writes one JSONL file per session under ~/.codex/sessions/<YYYY>/<MM>/<DD>/ with filenames like rollout-<ISO-timestamp>-<session-id>.jsonl. It eventually found the session, picked up the task, and finished it. I then happily went out for my bouldering session.
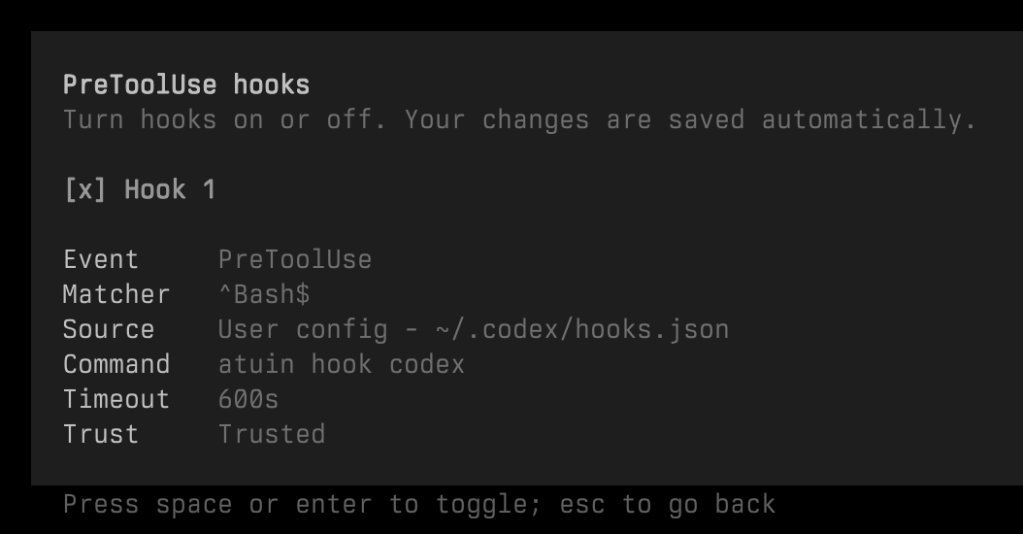
About two weeks ago, I tried out Atuin’s AI agent hooks to capture commands run by coding agents like Claude Code, Codex, and pi.
I installed the Codex hook (atuin hook install codex), but no commands showed up when running atuin search --author '$all-agent’. It turns out Codex hooks are behind a feature flag. To enable them, add the following to config.toml:
[features]
codex_hooks = true
Restart Codex after adding this.
Without this flag, hooks.json may be written correctly, but Codex won’t read it. Hopefully Atuin’s AI Agent Hooks will support Amp in the future.
[2026-05-09 update]
After upgrading to Codex CLI 0.129.0, I got the following message:
‘[features].codex_hooks’ is deprecated. Use ‘[features].hooks’ instead.
Yesterday I saw a TechCrunch report about a startup called Littlebird. The headline sums it up as an AI-assisted ‘recall’ tool that reads your computer screen.
Products like Rewind1 or ScreenMemory give me a better chance of recalling things I’ve seen but don’t remember exactly where I saw them. I actually just used ScreenMemory to find an X post I came across earlier. So I’m glad to see a new startup tackling this pain point, even if it is just one piece of a larger productivity problem space they’re targeting, like meeting notes or contextual insights in business workflows.
However, my excitement quickly faded after taking a closer look at how Littlebird works. My two main concerns are its text-only approach and the privacy implications.
From the news:
“We don’t store any visual information. We only store text, which makes the data a lot lighter-weight. I think that was probably another reason that Recall and Rewind struggled, which is that taking a screenshot is a lot more data hungry. I also think it’s more invasive,” he said.
In my experience, it’s not always about text. Sometimes what I want to recall is visual information, like what a UI element looked like or how a screen was laid out, which makes Littlebird’s text-only approach less effective.
And then there’s the privacy aspect. Littlebird stores all of your data on its servers. Yes, it’s encrypted, and you can delete it at any time. But I’d still prefer to keep this kind of data on my own machine from the start. Once everything is uploaded to the cloud, the real risk is that sensitive information may be exposed in the first place.2 Deleting it later doesn’t necessarily eliminate the legal exposure.
I think a product like Littlebird offers real value and could become even more powerful with AI. But not every feature needs to rely on cloud-based AI. Sometimes I just want to set a time range, search for a keyword, and maybe filter by app, similar to how Rewind works.
It would be great if Littlebird offered a paid offline plan without cloud AI and made the app easy to plug in local LLMs.
That said, I might not be the target user here. Ultimately, Littlebird seems to be going after a different market, closer to tools like Granola, rather than the use cases I care about.
The company does acknowledge that Littlebird may not be the right fit for users like me: “… for those who require absolute, iron-clad data privacy where nothing ever leaves your machine, Littlebird might not be the right fit for you at this moment.” ↩︎
When I was developing my little Mac app with Claude Code, I took many screenshots and shared them with the agent as feedback. You know the drill: press the keyboard shortcut to capture the screenshot directly to the clipboard, and then paste it into Claude Code’s message composer. Sometimes I have to capture many screenshots at once. However, there is no built-in feature that allows you to save multiple screenshots as separate items and then paste them individually into the message composer. I have to pick the images I need in Finder, copy and paste each image.1 When things aren’t going well, that process becomes especially painful.
About ten days ago, I saw a post on X from Thorsten Ball, an engineer at Amp. He said:
Dude, this was magical.
I had the agent add a feedback loop to the emulator, so the agent itself can run a command in the terminal emulator and capture the GPU buffer in a PNG file, which it can then look at.
I didn’t quite understand what he actually did at the time, because I missed his follow-up post.2 But it sounded really compelling. A few days ago, he mentioned the feedback loop again on X. This time, I did find the Amp thread he shared, but I thought the --capture flag was from a custom command or an MCP. I couldn’t figure it out. However, I believe he would talk about it on a live stream someday.
And here it comes, Thorsten Ball and his colleague, Ryan Carson, did a live stream on X. One of the topics is about Thorsten Ball demonstrating how the agent uses the feedback loop to make his terminal emulator correctly display the colors (around 22:43). And I finally understand, in broad strokes, what the --capture mode actually is and how the feedback loop works. As someone who isn’t an engineer, I found this genuinely eye-opening.
What Thorsten Ball did was asking Amp to build a feedback loop for itself, so it could see what was rendered on the GPU. And the result is not an external script or a MCP; it is built into the codebase, the terminal emulator that Thorsten Ball was developing. It is a feature built into the terminal emulator for the agent to use, not for the user.
Ryan Carson asked him, “how long did it take you to build the --capture feedback loop? Was that like a day?” “No, this was 20 minutes,” Thorsten Ball answered.3
Did I say that I found it eye-opening?
You need to watch the demo yourself to feel it. The agent not only wrote the code but also took screenshots to verify that its implementations worked as expected.
Thorsten Ball also made another fun demo. They called it a “prompt shootout” (around 44:47). He opened two terminal windows with Amp running in them, side by side. And then he made two different prompts for each agent, to ask them to fix an htop displaying issue in his toy terminal emulator. He asked one agent to use the feedback loop in the first prompt. And in the second prompt, he didn’t mention there is a --capture mode for the agent to use. You can see that the results are worlds apart, especially for this kind of task.
While I was watching the video, I couldn’t help thinking about my little Mac app’s settings window. Would it have been less painful if I had built a feedback loop—a --capture mode—into the codebase when I was vibe coding the app?
From my perspective—and maybe this analogy is imperfect—it’s like: I know FSD (Full Self-Driving) is a thing, and it’s getting better and better. But it’s another thing entirely when you actually see a car find its own parking spot after you get out, then drive itself back to pick you up when you need it.
At the end of the video, Thorsten Ball said, “I think that’s how codebases are going to change.” “… you want the ability for the agent to get feedback about what it’s working [on] and that’s not just good for the agent; it’s good for the human.”
At this point, if you think I’m exaggerating, hear Ryan Carson’s reaction: “… oh my God, I just—I never thought I’d get goosebumps talking about code, but I just did.”
“I think with these models getting better, I’ve been starting to think that the goalposts have shifted again,” Thorsten Ball said.
No wonder that Zed Industries, the company behind the Zed editor, wants to develop a new kind of database for future collaborations between human engineers and AI agents.3
It’s a great time to witness the AI-driven evolution—if not the outright revolution—of human–computer interaction. I can only imagine how dramatically things will change in the next few years (or months).
I guess there are some third party apps can do that. ↩︎
Apparently, I missed Ball’s follow-up post. He later shared some threads and showed us how he worked with Amp to add the feedback loop, and how the agent used it to finish the task. ↩︎
In Zed Industries’ latest round of fundraising announcement, they introduced DeltaDB, describing it as “a new kind of version control that tracks every operation, not just commits.” “DeltaDB uses CRDTs to incrementally record and synchronize changes as they happen. It’s designed to interoperate with Git, but its operation-based design supports real-time interactions that aren’t supported by Git’s snapshots.” ↩︎
When working with a coding agent, do you consciously keep the conversation short and start a new thread for a new task?
In September, Sourcegraph’s co-founder and CTO Beyang Liu took an interview on the podcast, Changelog Interviews.1 In the show, he shares his observations on how senior software engineers use coding agents. Compared with how non-engineering users tend to use them, he offers the following advice:
I would actually recommend… you should treat threads sort of like one-and-done, rip-off notes. Rip them off frequently rather than do the whole… like You don’t need to build the entire app inside a single thread. In fact, I would probably recommend against doing that, because you will get lower quality, higher latency, and more cost if you do that.
(The quote actually starts at 01:01:05, but I set the video to play from 59:06 to give more context.)
I am writing this post as a reminder to myself, because I was one of those people who kept working with the coding agent in the same thread, even when the tasks weren’t related, until we ran into the context limit.
A couple of months ago, I used ChatGPT to turn an idea into a little Mac app. I first used ChatGPT’s web app, and I made a workable prototype in an afternoon. (It’s incredible!) Later, I started using ChatGPT’s Mac app alongside Xcode. Eventually, I switched to Claude Code because of its reputation for coding.
I had been working with Claude Code in the same thread the whole time, handing it one task after another, until auto compact kicked in. Back then, I knew the thread would need compaction once we got close to the context limit, and I never really thought about why there was even a command to compact the conversation manually. Then one day I realized something was off: Claude Code suddenly seemed “dumber.” Even though we were still in the same thread, it seemed to have forgotten what we had talked about earlier and the tasks it had already completed. It was frustrating.
That was the moment I understood that the thread itself had become the problem.
Now I get it. After I listened to the podcast, I changed the way I work with coding agents. When I normalize my news database and build things on top of it with Amp, I keep threads short and, when possible, start a new one or use Amp’s handoff feature.
If you have the same issue I had, you can also read this guide on managing context from Amp. As the guide puts it, “The longer your conversation goes on, the higher the chances are the model goes ‘off the rails’: hallucinating things that don’t exist, failing to do the same things over and over again, declaring victory while standing on a mountain of glass shards.” It clearly explains why the user should manage context consciously, illustrated with diagrams created in Monodraw. And if you happen to be an Amp user, the guide also provides a series of features for working with the context window in Amp.
Now Sourcegraph and Amp are two separate companies. See “Amp, Inc.” for more details. ↩︎
I’ve been following the news about technology, startups, and venture capital firms for a long time. Every once in a while, I try to keep track of the names, the people and companies involved, and what they did when I’m reading tech news. But it always ended up like my childhood attempts at news clipping: I eventually gave up because it was too time-consuming and labor-intensive.
I still take notes when I read the news. However, if I could extract that kind of structured information from the news, that would be a good add-on.
Like many others, I’ve been playing around with AI since ChatGPT came out. One day, I read a post from Simon Willison. Through the links in it, I learned about LLM, a CLI tool and Python library he developed for interacting with LLMs (large language models). (To avoid confusion, I will refer to this tool as “LLM CLI” throughout the post.) As I read through the user manual, I discovered an interesting use of LLM CLI in the Schemas section, and eventually, I put together an AI-powered news clipping workflow.
In this post, I want to share how I built my AI-powered news clipping workflow. I’ve been using and tweaking this workflow from time to time since the end of May, when I started using LLM CLI. I’ll walk through the tools I used and how the system is structured, and hopefully this post will inspire you to adapt the idea for other types of news that interest you. If you are familiar with CLI tools, I think it would be easy to build. If you’re not, with some help from ChatGPT or Claude, it could also be done. (I’m the latter one.)
Basically, I want to have an LLM to do the news clipping job for me.
It’s like hiring an intern to read the news I assigned, make news clippings, and organize them into collections that I can easily refer to whenever needed.
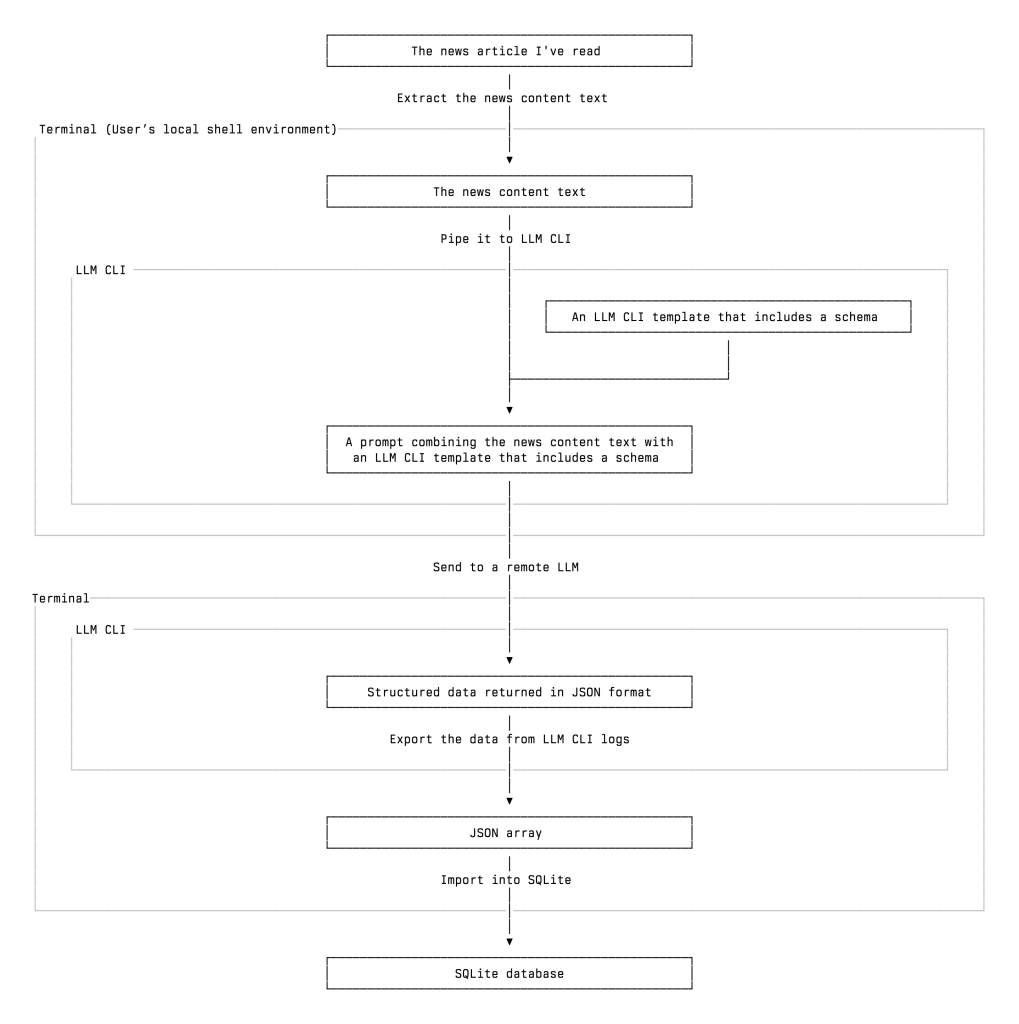
What I built is an automatic workflow of extracting and classifying information of tech news, especially the news about tech startups and VC firms, using the LLM I chose. Here is a simplified overview of my workflow, and I will leave some details for later:
I read a tech news article about a startup that raised funding from several venture capital firms. Then I decide whether to add those persons, organizations, and incidents into my database. You may wonder why I don’t record as much startup news as possible without reading it first. I will address this question later.
I send the news text to a remote LLM, such as ChatGPT or Gemini, through LLM CLI. The model extracts structured information from the article, including the people and organizations mentioned, whether they are VCs, their roles, and the actions they took, and returns it in valid JSON format.
I review and import the extracted data into a SQLite database, which I can later query or review as needed.
{"items":[{"name":"Nathan Sobo","organization":"Zed Industries","role":"CEO and co-founder","is_vc":"unknown","learned":"Nathan Sobo is the CEO and co-founder of Zed, emphasizing the importance of collaborative coding and linking conversations directly to specific sections of the code.","article_headline":"Zed Raises $32M Series B Led by Sequoia to Scale Collaborative AI Coding Vision","article_date":"2025-08-20"},{"name":"Sonya Huang","organization":"Sequoia Capital","role":"Partner","is_vc":"yes","learned":"Sonya Huang is a Partner at Sequoia Capital and expressed excitement about Zed's innovative approach to collaborative coding, indicating it represents a significant shift in software development.","article_headline":"Zed Raises $32M Series B Led by Sequoia to Scale Collaborative AI Coding Vision","article_date":"2025-08-20"},{"name":"none","organization":"Zed Industries","role":"none","is_vc":"unknown","learned":"Zed Industries is the creator of Zed, a high-performance open-source code editor focused on collaborative coding capabilities, which recently raised $32 million in Series B funding led by Sequoia Capital.","article_headline":"Zed Raises $32M Series B Led by Sequoia to Scale Collaborative AI Coding Vision","article_date":"2025-08-20"},{"name":"none","organization":"Sequoia Capital","role":"none","is_vc":"yes","learned":"Sequoia Capital led the $32 million Series B funding round for Zed Industries, indicating their support for innovative technology in developer tools.","article_headline":"Zed Raises $32M Series B Led by Sequoia to Scale Collaborative AI Coding Vision","article_date":"2025-08-20"}]}
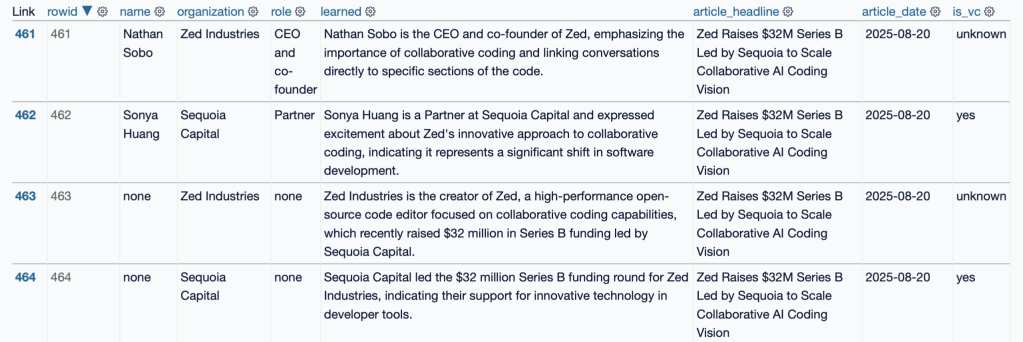
After importing, it will look like the following screenshot in a database:
▲ After importing the JSON data into the database, this is the view of that database in the browser using Datasette
Eventually, I combined parts 2 and 3 into one command. If I want to skip the review step, I can just read the news and send it to an LLM, and the news clipping job gets done.
Why I Built This Workflow and How I Use It
Before we move on, I must emphasize that I only apply this workflow to news articles I have personally read. I’m not inclined to process as much news as possible just because it can all be done quickly and automatically. I built this tool to give myself a “sort of” reliable source that helps me keep a close eye on tech and the VC industry.
Another thing I hope you keep in mind is that my workflow is not intended to achieve 100% accuracy. And that’s why I say this workflow is “sort of” reliable.
In my experience, an LLM often succeeds in determining whether someone is a VC based on news content, but for various reasons it sometimes misses. The LLM’s accuracy can never reach 100%. For that reason, I don’t count on it to generate 100% correct data. And that’s why I only use it to process what I read, not what I didn’t read.
After all, I have some confidence in remembering what I read. If I need to check something, the database is always a few keystrokes away. I can retrieve the source (the news article I read) from it.
A good way to think about LLMs is to treat them like interns. Sometimes you feel grateful for their contribution and think they have a lot of potential, and sometimes you feel you should have done the work yourself. As technology analyst Benedict Evans often compares AI to interns, he once said:1
If you have 100 interns, you can ask them to do a bunch of work, and you would need to check the results and some of the results would be bad, but that would still be much better than having to do all of the work yourself from scratch.
The Workflow Breakdown
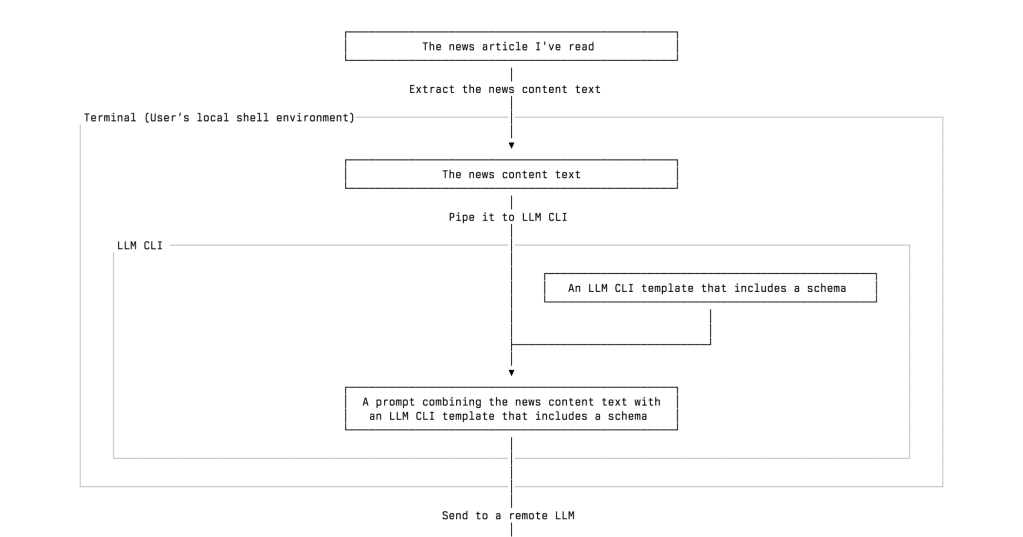
Now, let’s take a closer look at how my workflow operates. The workflow consists of the following steps:
Read a news article
Prepare the text content of the news articles I’ve read
Pipe the news content text to LLM CLI. It will treat the piped content as part of the prompt it’s about to send with other things/arguments to the LLM you designated.
Apply the schema and template. They are the keys to our workflow. We need a way to make sure that the LLM will return the right structured data we need in valid JSON format. To achieve it, we use LLM CLI’s schema and template features. We will talk more about them later.
Get the LLM’s response in a valid JSON format
Import the data into a SQL database
Review, query, or update the data as needed
▲ A vertical flowchart of my AI-powered news clipping workflow
What We Need
Most parts of my workflow run in the terminal shell. I use zsh in Ghostty. And to build up this news clipping workflow, we also need:
An LLM API key (or you can use a local LLM)
A tool that can fetch the news content. I use the Readwise Reader API to retrieve the full text of the articles I’ve saved and their metadata. There are other options, such as Instapaper’s Full Developer API or Jina AI. In the LLM CLI user manual, Simon Willison uses strip-tags in an example. LLM CLI also supports attaching a PDF with a prompt and sending it to the LLM. So if, for some reason, I can’t extract the text, I can use PDF as a fallback
A database. I use SQLite, which comes with macOS. I also use sqlite-utils and Datasette to work with the database, both developed by Simon Willison.
Step-by-Step Guide to Building the Workflow
Now we have all the ingredients, let’s make the workflow work. Here is an overview of the steps:
The first step is to get the full text of the news article I’ve read. I ask ChatGPT to write me a zsh function that I can use Readwise Reader’s tag feature or the article ID to designate which article I want to use, or use the latest article I saved, and then pipe the full text with some metadata, such as title and date, to LLM CLI.
If you just want to try it quickly, you can use Jina AI to get the full text of an online post (although it won’t be as clean as the results I got from Readwise Reader):
curl "https://r.jina.ai/https://www.example.com"
# replace `https://www.example.com` with the url of the news article you want to process
The cleaner the full text of the news article you send to the LLM is, the higher the chance you’ll get high-quality output. Or you can simply use a powerful (and usually more expensive) LLM to get a better output.
2. Install and Set Up LLM CLI
Before we move to the next step, you need to install LLM CLI. You can find the instructions on the website. I used pipx to install LLM CLI. But I’m considering using uv instead. If you want to use Homebrew to install LLM CLI, please read the warning note.
pipx install llm
After installation, you need to set up an LLM API token. If you want to quickly test many different LLMs and find the right one that can return the result you need, you need to install some plugins to use those remote LLMs from Anthropic or Google Gemini.
llm keys set openai
Then you will be prompted to enter the key like this:
After that, you can start designing and setting up the schema and template. Later, you can add the template as an argument to the -t option. You can find very detailed tutorials on setting up LLM CLI and other things we need on its website.
3. Design the Schema and the Template
The most crucial part is to make sure the LLM does precisely what you ask and returns the data in the correct format. And that, for LLM CLI, means designing the right schema and template, which determine what and how the LLMs extract information from the article and return it to you.
Fortunately, Simon Willison already provided a good foundation in the Schemas section of LLM CLI’s user manual. I basically added a few more items and tried it with different models to see what I got from the news articles.
As Simon Willison wrote in the Schemas section of LLM CLI’s documentation, “Large Language Models are very good at producing structured output as JSON or other formats. LLM’s schema feature allows you to define the exact structure of JSON data you want to receive from a model. [in this context, “LLM” refers to Simon Willison’s LLM CLI]”
In LLM CLI, a schema defines the exact JSON structure you want the model to return, including fields such as name, organization, role, and so on.
A template A template builds on top of that schema and includes the system prompt, model selection, and other options. By combining these parts, it tells the LLM what to extract and how the model should perform the extraction.
In practice, you can use a template to ask an LLM to extract specific information from a news article and return it as structured JSON data, which can then be imported into a database. Together, the schema and template features make it possible to reliably extract structured data from unstructured text.
Here, you can define a schema for what we want the LLM to return and save it as a template:
Next, you can edit the template we just saved to tell the LLM how we want it to do the news clipping job. To edit a saved template, we can run:
llm templates edit people
This opens the template in your default shell editor (for example, the editor specified by $EDITOR or $VISUAL). After saving and closing the editor, the template is updated. The edited template may look like this:
system: |
  Extract all people and organizations from a startup funding article.
schema_object:
    type: object
    properties:
        items:
            type: string
        name:
            type: string
        organization:
            type: string
        role:
            type: string
        is_vc:
            type: boolean
        learned:
            type: string
        article_headline:
            type: string
        article_date:
            type: string
    required:
    - items
    - name
    - organization
    - role
    - is_vc
    - learned
    - article_headline
    - article_date
There are some interesting challenges for LLMs in extracting the correct information. For instance, sometimes Readwise Reader parses the commercial text in an article, and the text happens to be about VCs and startups. To prevent the irrelevant content from contaminating the data, you can added one line in the template: “Do not include any information that comes from advertisements, sponsored content, or promotional material.”
4. Pick a Model
The quality of the output we got (using the same template) depends on what model we use. LLM CLI provides a handy interface that lets us quickly switch between many LLMs via its plugin system.
After several iterations, I found that gpt-4o-mini is quite suitable for its cost, and of course, you can use a more powerful LLM like GPT5 to get better results, but it’s way more expensive. Considering the API cost and the quality of the results, I think Google’s Gemini 2.5 Flash Light is also one of the best choices. With these two models, I consistently get good results across different news articles from various outlets.
Because I don’t see the LLMs as 100% accurate tools, I think the key is to find the balance between cost and good-enough results.
If you want to check the LLM’s output before importing the data into the database, you can split the workflow into two parts and make the LLM’s return the breaking point.
5. Import the Data
LLM CLI has a great feature: it automatically logs every conversation to a SQLite database. (It can be turned off.) This means we don’t need to capture the model’s output immediately after receiving the returned data, because we may want to ask the LLM to modify the data or try another LLM. Later, we can extract the structured JSON directly from the logs and import it into our own SQLite database using sqlite-utils. (Here’s a link that explains how to work with the LLM CLI logs.)
To set up the uniqueness key and import the data:
# 1. Retrieve the structured JSON from the most recent LLM response
llm logs -c --schema t:funding_people --data > /tmp/funding.ndjson

# 2. Insert it into our SQLite database using a unique constraint
sqlite-utils insert data.db people_orgs /tmp/funding.ndjson --nl \
  --unique name organization article_headline
Using --unique here is intentional. Because we may need to make further adjustments in the near term, a unique constraint provides duplicate protection without forcing the table to use a rigid primary key. This makes the pipeline safe to rerun and easier to adjust as the structure of your extracted data changes over time.
Putting everything together, here is a one-liner that demonstrates how all of these individual steps come together. This example fetches the article, strips the HTML, applies the template, sends it to the remote LLM, and finally imports the returned structured data into your SQLite database using the logged result:
This compact pipeline shows the entire workflow executed in one command: retrieve the full text, clean it, extract structured data using your template, read the result back from LLM CLI’s logs, and load it into your database with a unique constraint.
6. Play with the Database
After that, you can use Datasette to review the database in my web browser:
datasette "<PATH_TO_DATABASE>"
It will show you something like:
INFO: Uvicorn running on http://127.0.0.1:8001 (Press CTRL+C to quit)
Then you can open the URL in a browser to interact with the database.
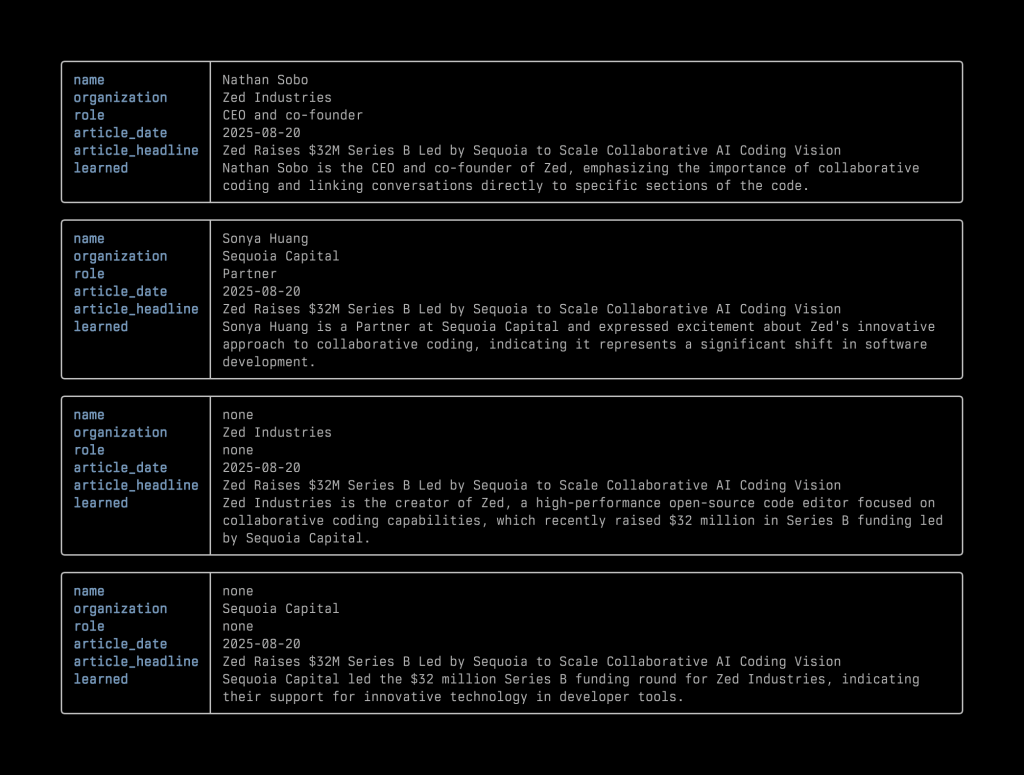
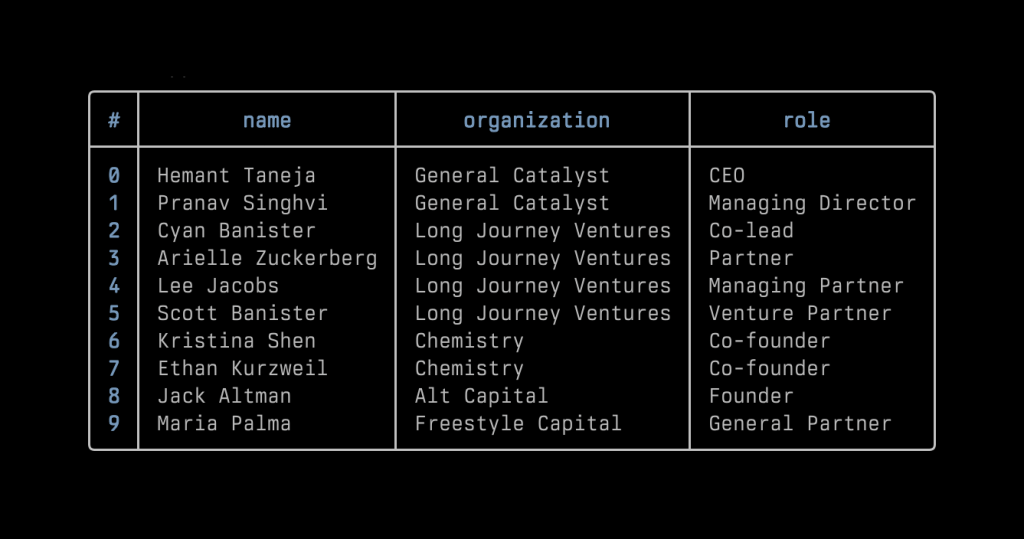
Now that we have a database, we can run some queries. For now, what I need is simple: filtering out VC people and assembling them into a table. So I wrote some scripts using the query to display that information quickly in my terminal. Later, I happened to learn about Nushell and really like the way it displays data. I’ve included two screenshots for reference: one shows the data extracted from the Zed fundraising news as rendered in Nushell, and the other shows part of the list of VC people in the database.
In an ideal circumstance, I would export the data into separate tables such as founders, venture capitalists, startups, and VC firms. I could take it a step further by asking an LLM to return another JSON array describing the funding activities, including the amount of money, the valuation if mentioned in the article, the round type, and so on. For now, I am keeping everything in a single table because the data is still fairly simple.
Just as some readers may think when they read this series of commands, I found it a bit cumbersome to type them all manually. Therefore, I asked ChatGPT to write some scripts to automate everything, and then I made the scripts into zsh aliases. Now my whole workflow is:
Read the article
Send it to Readwise Reader with a tag using a web browser extension or a single Alfred command
Open Ghostty’s quick terminal and input the alias. Done
I think I can even make this shorter by combining steps 2 and 3 via a self-made Alfred Workflow.
Some Remaining Issues and Future Potential
And considering the other well-known characteristics of LLMs: they can’t produce deterministic results, which means we can’t expect the LLM to generate precisely the same role title in the same writing style for the same person or organization. For instance, some articles refer to the firm as “a16z,” while others use its full name, “Andreessen Horowitz.” Similarly, even for the same role, such as “CEO,” an LLM might output ”ceo” in lowercase or spell it out as “chief executive officer,” not to mention the inconsistency in capitalization. An LLM just can not retain the memory in the way I use the API. (There are many traditional solutions for these kinds of issues, though.)
Recently, I’ve been playing with Sourcegraph’s coding agent Amp Code. It’s a very good product, the pace of the team’s product development is incredible. I used its smart mode to normalize my flat table, then kept building on it using its free mode. I already completed the database migration and started to build a new version of my workflow. For instance, I can now get information like “Who is involved in Zed Industries’s latest round of fundraising?” more efficiently.
Or even better, with this database, I can use LLM CLI’s plugin like llm-tools-sqlite to ask an LLM questions about the data in natural language, and the model will generate the necessary SQL queries to retrieve the answer. I can also connect this database to Claude Desktop using an MCP server, which allows me query it in natural language directly from the app.
A Byproduct of Learning
I’ve spent more and more time in the terminal and shell environment after I started playing with Raspberry Pi a few years ago. By building up this workflow, I got familiar with LLM CLI and a bunch of other new tools. I’ve learned that shell scripts and Python scripts are nimble and versatile. With the help of ChatGPT and coding agents like Claude Code or Amp Code, I can quickly experiment with many ideas to improve the workflow. In the end, this AI news clipping workflow is more like a byproduct of my learning to use the software. It is really fun.
Again, I don’t use this workflow to process as many articles as possible. I use it as a reference to what I’ve already read. It’s more like a pitcher’s pitch-by-pitch tracking data: it doesn’t capture the whole game, and it certainly doesn’t replace the conversation between the pitcher and the pitching coach. The core is still the same: reading the news, taking notes, and writing down my own thoughts.
As I mentioned earlier, it’s possible to apply this workflow to many other kinds of news, like professional sports player trades, business, or politics, once you can break down the news content into structured elements, such as people, organizations, events, and so on. If you have tried it, I’m happy to learn how things are going.
This Simon Willison’s post is mainly about NVIDIA’s DGX Spark, which has just started shipping, but what really caught my attention was the part where he mentioned Tailscale, and the subheading is “Tailscale was made for this”:
Having a machine like this on my local network is neat, but what’s even neater is being able to access it from anywhere else in the world, from both my phone and my laptop.
Tailscale is perfect for this. I installed it on the Spark (using the Ubuntu instructions here), signed in with my SSO account (via Google)… and the Spark showed up in the “Network Devices” panel on my laptop and phone instantly.
I can SSH in from my laptop or using the Termius iPhone app on my phone. I’ve also been running tools like Open WebUI which give me a mobile-friendly web interface for interacting with LLMs on the Spark.
That is what I’ve been talking about with my friends. Although I don’t have a powerful Mac mini or a shiny DGX Spark, the way I use Tailscale is approximately what Simon Willison described in his post.
When I take a break between bouldering sessions, believe it or not, I sometimes use the Termius app on my iPhone to SSH into my Mac at home, check Claude Code’s work, or assign it new tasks via tmux running in Ghostty on my Mac.1 Or when I come across noteworthy startup fundraising news on the go, I can use my iPhone to pull the same trick: ask an LLM to do the news clipping for me via Simon Willison’s LLM CLI running on my Mac at home. (Hopefully I will write about my LLM news clipping workflow soon. 2025-11-20 Update: I wrote a post about it.)
Sometimes how I use Tailscale has nothing to do with AI. For instance, I host Linkding, an open source bookmark web app, on my Raspberry Pi, and I want to use it on my iPhone without exposing it on the internet. In this case, I can use Tailscale Serve to securely access it through my tailnet as if I were on the same local network.
Another use case is about safely using untrusted Wi-Fi. I use one of my Raspberry Pis as a Tailscale exit node, so when I’m at a coffee shop with untrusted Wi-Fi, I can turn on Tailscale on my MacBook Air and securely route all my traffic through the exit node—Tailscale encrypts every packet between my MacBook Air and my Raspberry Pi using WireGuard,2 so even on an untrusted Wi-Fi, no one can snoop on my connection. In fact, I created a Keyboard Maestro automation that connects my MacBook Air to the Tailscale exit node whenever it joins a Wi-Fi network that’s not on my allowlist.
As a user, I appreciate how easy Tailscale is to set up, even though I’m only using a fraction of its capabilities. As an observer who is interested in the tech startup scene, I’ll definitely keep a close eye on how Tailscale grows as a business.
In July, I came across a thread on Mastodon about a new app called Macrowave. It is “a native macOS & iOS app that makes it easy and fun to share system audio with friends to listen to music together,” as the co-creator, Lucas Fischer, said in this toot. A few days ago, Macrowave officially launched.
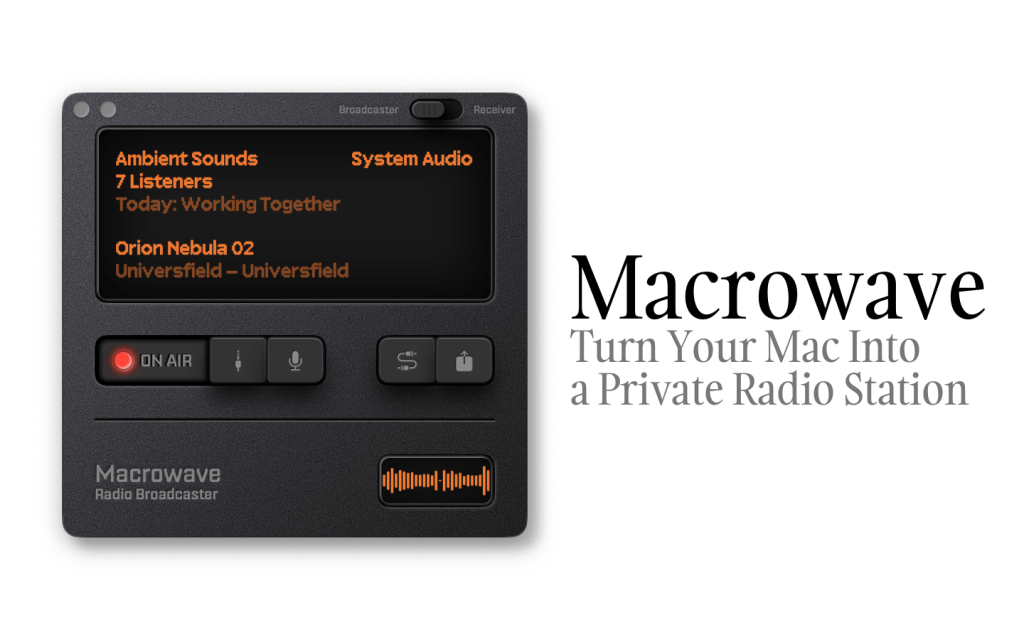
▲ Macrowave’s Mac app in “Broadcaster” mode (Source: Macrowave’s press kit)
What caught my eye at first was, of course, the retro-style visual design. It resembles a portable radio and reminds me of the Apple Podcasts app from 2012. I don’t know the two developers behind Macrowave personally, but I bet they had fun designing it.
But the real deal for me is the ability to easily share my Mac’s system audio, which means I can run my own station. I’ve always been into audio broadcasting: not only have I been a long-time radio and podcast listener, but I also produced and hosted several podcasts.
Three Steps to Start Your Station
Macrowave streams audio via low-latency WebRTC peer-to-peer connections.1 Its Mac app has two modes: the “Broadcaster” is lets you stream audio, and the “Receiver” is for listening to stations.
If you want to make a live audio broadcast, you just need three steps:
Sign up using Apple Account
Set up a username
Give your station a name and a short description
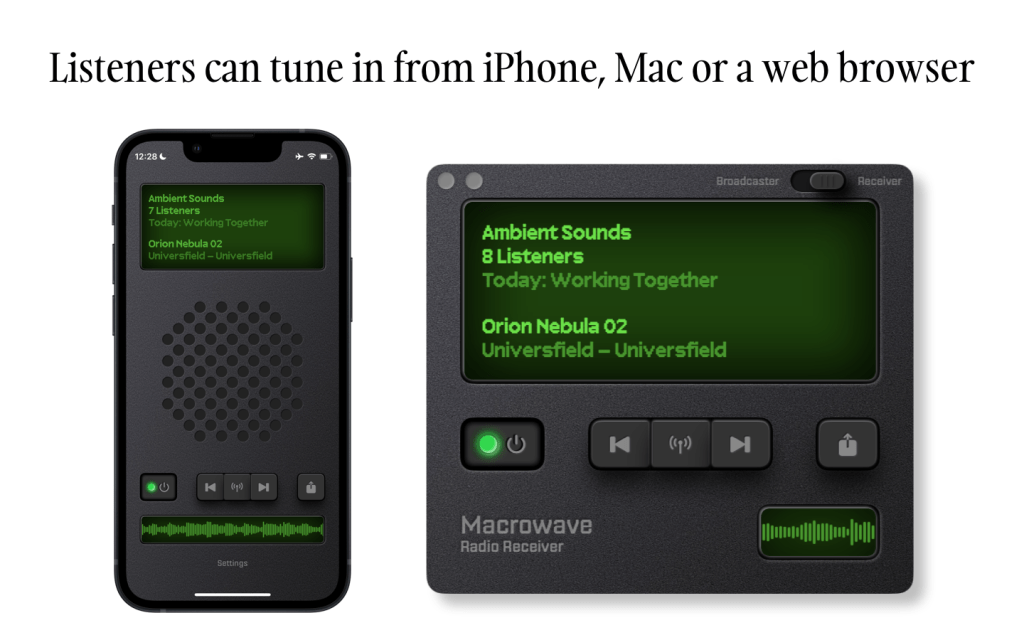
After that, you can share the link to your station with others to let them tune in. If your audience has enabled notifications, they will be notified when your station is on air. People can listen to the station through Macrowave’s Mac and iOS apps, or via a webpage.
▲ Macrowave’s iOS and Mac apps in Receiver mode, with the iOS version limited to listening to stations. (Source: Macrowave’s press kit)
You can choose what audio to stream—whether it’s the system audio (everything you normally hear from your Mac), audio from a specific app, or even from a single window. (Important: you must use this app wisely, as Macrowave states at the bottom of its website, “broadcasters are responsible for obtaining appropriate licenses for any copyrighted content they stream.”)
In an update released shortly after launch, Macrowave revealed its subscription pricing for broadcasting: $3 per week (with a three-day free trial), $8 per month, and $60 per year.
I’ve been using Rogue Amoeba’s Audio Hijack for years. One of its features, the Broadcast block, can stream audio from your Mac to an internet streaming server powered by Shoutcast or Icecast,2 allowing you to run a live broadcast. While powerful, it requires more setup and technical know-how. Macrowave, on the other hand, makes the process far simpler and more approachable for casual broadcasters.
My Experience
From my brief experience using the app, I found that it doesn’t work well with my Audient iD4 audio interface. The mic input works fine, but for some reason, I couldn’t get the music playback to work in conjunction with it. However, if you use the Mac’s built-in mic (or something like EarPods connected via the audio jack), it works well.
As mentioned earlier, people can listen to your station via a link. In the first version, changing your username didn’t automatically update the link, but yesterday’s update (version 1.0.2) fixed this. If you encounter this issue, make sure you’re running the latest version.
Since broadcasting your Mac’s system audio requires specific permissions, you might wonder why it asks for “Screen & System Audio Recording” instead of just “System Audio Recording.” According to Lucas Fischer, this is due to a technical limitation of their upstream provider, despite the app only using audio from the screen sharing. They are working on it and plan to release a new version that requests only the “System Audio Recording” permission, but they must wait for the necessary changes from their provider.3
Thoughts and Questions
Macrowave has been officially available for less than a week, yet I already have many questions about where it’s headed. Will it become a two-way audio platform like Clubhouse or X Spaces, or stay as a simple broadcasting app? Will it introduce a text-based chatroom alongside each station? How does the app help users discover new stations? While I don’t think Macrowave is necessarily destined to be a major hit, there’s certainly room for a niche product like it.
Some aspects of the interface and visual design could be improved. For instance, the app lacks safeguards to prevent accidental quitting while broadcasting, and certain UI elements like button shadows don’t feel right to me. Still, Macrowave is genuinely a fun and intuitive app to use.