I like MailMate and use it as my default email app on my Mac. I wrote about MailMate in this post (in Traditional Chinese, though). One of its biggest strengths is that it’s highly customizable.
However, many of its customizations aren’t available in the app’s settings panel. You have to set up these hidden preferences through the Terminal. You can find the relevant instructions in MailMate’s user manual. Today, I want to share three useful hidden preferences in MailMate that make it more convenient and better suited to my needs.
1. Set a “Delayed Sending Time”
The first one is setting a default delayed sending time. As the name suggests, this lets you specify a delay before emails are actually sent.
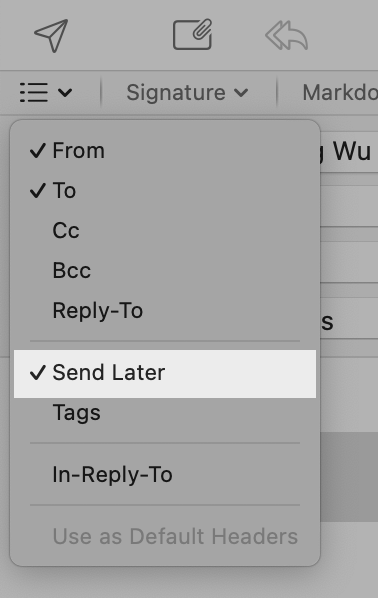
MailMate does have a built-in “Send Later” option in the composer. There’s a list icon (with a “⌄” symbol) in the upper-left corner of the window, below the paper plane icon (the “Send Message” button). “Send Later” is in the dropdown menu.
But this is a one-time setting—it only applies to that specific message. I want to show you how to set up a default Send Later time. This setting effectively combines the benefits of both Undo Send and scheduled sending.
To enable it and set the default delay, run the following command in Terminal:
defaults write com.freron.MailMate MmSendMessageDelayEnabled -bool YES
To disable it:
defaults write com.freron.MailMate MmSendMessageDelayEnabled -bool NO
The default delay is 5 minutes. If you want to change it, use:
defaults write com.freron.MailMate MmSendMessageDelayString -string "3 minutes"
My setup is 40 seconds, so the command would be:
defaults write com.freron.MailMate MmSendMessageDelay -integer 40
(If you don’t include a time unit, seconds will be used by default.)
Please note: you must relaunch MailMate after running these defaults commands for the changes to take effect. After relaunching, you’ll see a new header in the composer named “Send Later,” and the time you set will appear there every time you compose a new message or reply.
After hitting the send button, the message will be temporarily placed in a mailbox named “Outbound.” Before the timer runs out, you can still edit or cancel the email.
Scheduled Sending
With this new “Send Later” header, you can also schedule messages using natural language. For example, if you want to send an email at 10 am tomorrow, type “10 am tomorrow” in the “Send Later” field. And if you’re not sure whether your input is valid, the manual explains:
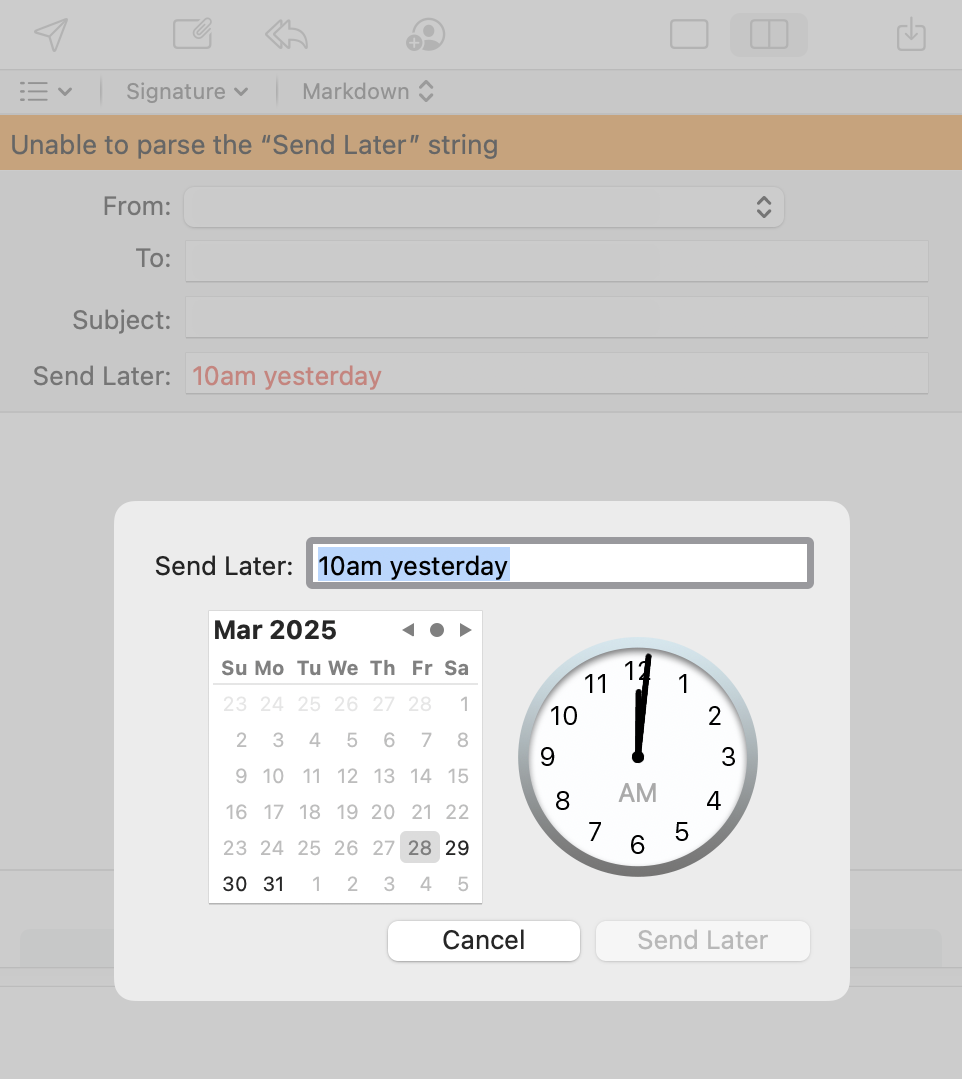
If MailMate cannot parse the expression and the user tries to send the message, then a sheet is shown which allows the user to correct the problem or set an exact time using a calendar and a clock.
As shown in the screenshot below, if you see the text in the “Send Later” field turn red, it means that MailMate can’t parse the expression. Then, after you hit the send button, a reminder with an orange background will appear, along with a sheet containing a calendar and a clock that let you correct the “Send Later” time.
One limitation of this feature is that MailMate must be open and your Mac must be connected to the internet when the message is scheduled to send.
Since this changes the default sending behavior, MailMate will display a warning about pending delayed messages when you quit the app. You can also disable or modify this warning if needed.
2. Change the Focus in the Composer
If, like me, you prefer to always have the focus in the text editor when opening a composer window, you can use this command:
defaults write com.freron.MailMate MmComposerInitialFocus -string "alwaysTextView"
To revert to the default:
defaults delete com.freron.MailMate MmComposerInitialFocus
I find this setting useful because it lets you start writing the email as soon as the composer window opens. There’s also a nice side effect: since the focus is in the text editor and not the “To” field, you haven’t filled in the recipient’s address. This significantly lowers the chance of accidentally sending the email. (Well, if your cat somehow hits the keys in a perfect sequence, an accident could still happen.) However, this “nice side effect” doesn’t work when replying to a message, so be careful.
3. Enable Auto-Expanding Email Threads
I prefer viewing emails in thread mode, and I like MailMate to automatically expand all threads at all times. You can enable this with:
defaults write com.freron.MailMate MmAutomaticallyExpandThreadsEnabled -bool YES
(New messages will also trigger auto-expansion.)
If you want MailMate to expand only those threads that contain unread messages, use:
defaults write com.freron.MailMate MmAutomaticallyExpandOnlyWhenCounted -bool YES
Bonus: Turn on Automatic Message Selection After Switching Mailbox
When Benny Kjær Nielsen, the developer of MailMate, introduced this setting in revision 6216 (BETA) on January 26, 2025, he mentioned it as an experimental feature:
Changed: Automatic message selection (after switching mailbox) can now be enabled (
MmAutomaticMessageSelectionEnabled). Consider it experimental for now.
Although it’s experimental, I’ve found it useful. I use the “Correspondence” layout, and with this enabled, MailMate automatically displays the last message (because it’s selected) after I switch mailboxes—saving me the extra step of pressing Tab.
To enable it:
defaults write com.freron.MailMate MmAutomaticMessageSelectionEnabled -bool YES
To disable it:
defaults write com.freron.MailMate MmAutomaticMessageSelectionEnabled -bool NO
I think MailMate has so many “hidden preferences” because it’s hard to fit them all into the settings panel. And, according to Benny, most of them are experimental:
Some have just not been added to a Preferences pane yet, but most of them are used to enable experimental features which cannot yet be considered stable or complete features.
However, in my experience, the first three “hidden preferences” I introduced have been stable for the past two and a half years.
If you’re a MailMate user and haven’t explored these hidden preferences yet, I encourage you to check out the MailMate user manual. There’s a lot of useful information there, and I’m sure you’ll find something that fits your workflow.
Even if you’re not comfortable applying the settings yourself, you can export the manual pages as PDFs and upload them to an LLM chatbot like ChatGPT or Claude. Then, you can ask it to help you identify features that might be useful for you and how to enable them.
I plan to share more of my settings and tips on using MailMate in the future. I’d love to hear what features you enjoy most, or any handy settings you’d recommend.
