Although I didn’t join MailMate’s mailing list, I visit the archive from time to time, and sometimes I learn good tips and tweaks from it. Today, I’d like to share a useful tweak I recently came across in this thread: how to add a custom column to display a sender’s email address in MailMate’s message list, along with some variations.
In short, the OP wanted to have a column in MailMate’s message list to display the sender’s email address, so he can spot potential phishing emails instead of opening them to check From: in the message view.1 By default, the From column in the message list shows only the sender’s name, and there is no such Address column in the View > Columns menu.
Out of curiosity, I checked Gmail’s web app, Mimestream (a 3rd party Mac email client for Gmail), and Fastmail, but none of them show the sender’s email address in the message list by default. They only show the address information in the message view.
A few days later, Benny Kjær Nielsen, the developer of MailMate, replied with a solution:
If you create the following path and then save the attached file then you should have a new column available for the message list (named “From Address”):
/Users/<username>/Library/Application\ Support/MailMate/Resources/MmMessageListView/
Here are the content of the plist file attached at the end of Benny’s response:
{
            columns =
            {
                    fromAddress =
                    {
                            title = "From Address";
                            sortKey = "from.address";
                            formatting =
                            {
                                    formatString = "${from.address}";
                                    placeholderString = "(No Sender)";
                                    doubleClick =
                                    {
                                            titleImage = "NSUser";
                                            titleSymbol = "person.fill";
                                            titleFormatting = { prefixString =
    "From "; formatString = ""${from.address}""; separator = " or "; };
                                            queryFormatting = { formatString =
    "from.address = '${from.address}'"; separator = " or "; escapeSingleQuotes = 1;
    };
                                    };
                            };
                            relatedSearches =
                            (
                                    {
                                            titleImage = "NSUser";
                                            titleSymbol = "person.fill";
                                            titleFormatting = { formatString =
    "From "${from.address}""; separator = " or "; };
                                            queryFormatting = { formatString =
    "from.address = '${from.address}'"; separator = " or "; escapeSingleQuotes = 1;
    };
                                    },
                                    {
                                            titleImage = "NSUser";
                                            titleSymbol = "person.fill";
                                            titleFormatting = { formatString =
    "From "${from.name}""; separator = " or "; };
                                            queryFormatting = { formatString =
    "from.name = '${from.name}'"; separator = " or "; escapeSingleQuotes = 1; };
                                    },
                                    {
                                            titleImage = "NSUser";
                                            titleSymbol = "person.fill";
                                            titleFormatting = { formatString =
    "From or To "${from.address}""; separator = " or "; };
                                            queryFormatting = { formatString =
    "#any-address.address = '${from.address}'"; separator = " or ";
    escapeSingleQuotes = 1; };
                                    },
                                    {
                                            titleImage = "NSUser";
                                            titleSymbol = "person.fill";
                                            titleFormatting = { formatString =
    "From or To "${from.name}""; separator = " or "; };
                                            queryFormatting = { formatString =
    "#any-address.name = '${from.name}'"; separator = " or "; escapeSingleQuotes =
    1; };
                                    },
                            );
                    };
            };
    }
But Benny didn’t mention the name of the attached file. (As I said, I didn’t join the mailing list, so I don’t know what the attached file would look like in a real email.) Then I recalled that I had read something about it in MailMate’s user manual; it should be named outlineColumns.plist.
Once you have finished the setup and relaunched MailMate, you should see a new option named From Address in the View > Columns menu. Now you can combine the default From and the new From Address column to display the complete information about the sender in the message list.
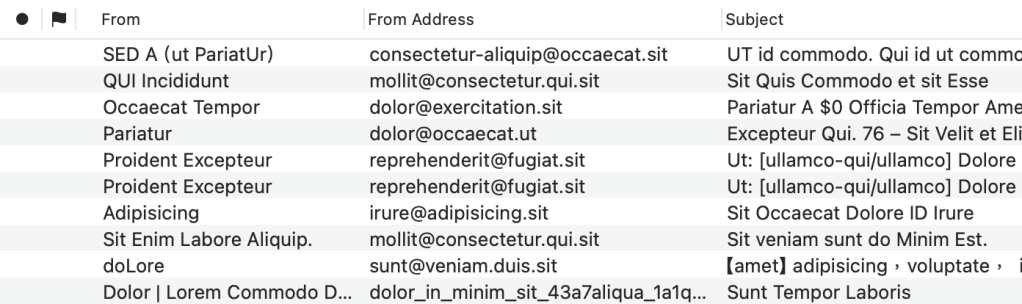
▲ You can combine the default “From” and the new “From Address” column to display the complete information about the sender in the message list. (The text in the screenshot looks odd because I enabled “Distortion Mode” in MailMate.)
An Alternative Tweak
However, if you feel that those two columns use too much space on the screen, the OP provided a tweak to mitigate it. You can replace formatString = "${from.address}"; in line 10 (of the content of the plist file I showed above) with formatString = "${from.name:-${from.address}}${from.name:+ (@${from.domain})}";. Now you get Someone (@example.com) instead of someone@example.com in the From Address.
After all, what the OP wants is to verify whether the domain name of the sender’s address looks suspicious. There is probably no need to display the username in the message list. Additionally, since we have both the sender’s name and the domain of the address in From Address, this makes the From column redundant.
If you make the tweak, you may want to hide the From column. But at this moment, the From option is not only checked but also grayed out in the View > Columns menu. To remove the From column, you have to choose the From Address option in the View > Columns > Outline Column at first. Then, you can uncheck the From option in the View > Columns menu.
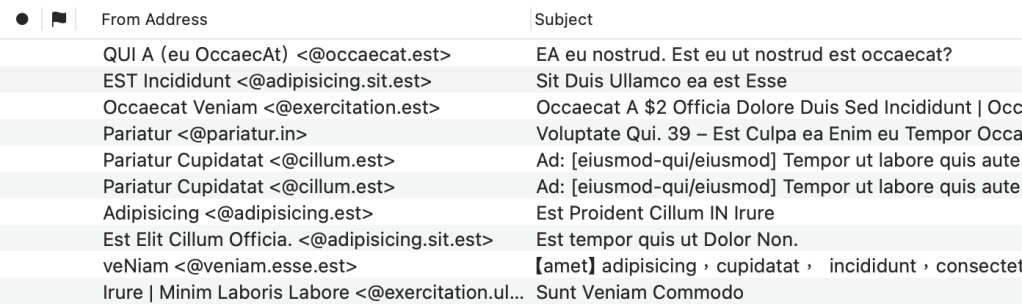
▲ The OP’s design can replace the default “From” column and save some screen space. As you can see, I replaced “()” with “<>” to mimic the usual way of displaying sender information, such as “Someone <someone@example.com>”.
A Little Tweak, Huge Satisfaction
I appreciate the OP’s design for presenting more information in a compact and streamlined way. The discussion thread I mentioned earlier also demonstrates just how customizable MailMate is.
In today’s Mac ecosystem, it’s increasingly rare to find apps that allow this kind of low-level tweaking. Apple could do more to encourage users to explore slightly more advanced interactions with macOS.
Don’t get me wrong. It’s not that Apple has done nothing. Shortcuts is a very good example that encourages users to try building automations that fit their needs. But Apple could go further.
As users become more comfortable with this kind of control, they’ll start to expect—and value—more flexible and powerful Mac software.
For users, in an age where help is just a search or a chat away, discovering that they can interact with their computers in this way will not only help them get things done but also reveal that they can accomplish much more. And more importantly, it’s fun and delightful.
Related Posts
-
Speaking of phishing email, Benny wrote a post about how he implemented a feature of warning the user about email address spoofing. The mechanism is simple and clever:
Whenever the name part of an address header contains a
@then it’s replaced with a skull (💀). That should at least make the user aware of simple attempts to spoof an address header. ↩︎
